
Semaphore2.0 Steps:
Setup git project:
-
- Get ready with all latest/fresh data/files which you are going to deploy on server.
- Create required branches on git which you want to deploy on server and put fresh data on git.
- Create .semaphore folder on root of the project and inside of .semaphore folder create semaphore.yml file. The semaphore.yml file looks like below
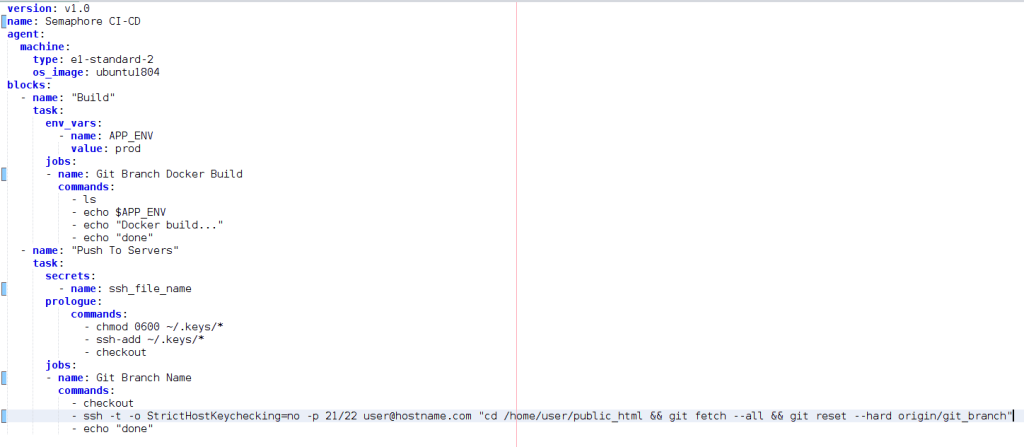
where you can change following values:-
- Git Branch Docker Build.
- ssh_file_name (it’s name can be changed but name should be remembered, same ssh title and file should be created later).
- Git Branch Name (This block pulls data from git to server, you can change it’s name to anything you want).
ssh -t -o StrictHostKeychecking=no -p 21/22 user@hostname.com "cd /home/server-user/public_html && git fetch --all && git reset --hard origin/git_branch"this is the command to pull data from git to server, where user@hostname.com is your server user and host-name and git_branch is branch name which you want to pull from
-
- Now push to git after changing semaphore.yml file. (it’s compulsory).
Setup on server:
-
- Login via ssh to the server.
- Remove .git folder, .gitignore(don’t ignore) and .gitattributes from server if exists.
- Run command:
ssh-keygen -t rsa -b 4096 -C ssh_file_name, Just hit enter key do not change anything (path or name). key tile must be same name like ssh_file_name which you have already assigned on semaphore.yml file. - Download id_rsa and id_rsa.pub files to local from .ssh folder, which is on the root of server.
- Rename id_rsa to ssh_file_name and id_rsa.pub to ssh_file_name.pub.
- Go to https://github.com/settings/keys and paste content of ssh_file_name.pub file to add new ssh, title will be automatically created having the title name ssh_file_name.
- Go to cpanel and add/paste the same public key(ssh_file_name.pub) to SSH section.
- Run cmd:
ssh -T git@github.com, must say “hi username, ….” (it means your server is successfully connected with git server). - Create required directory for related branches like:
cd /home/server-user/public_html. - Hit follwing git commands :
-
git initgit remote add origin git@github.com:git-username/git-repo.git(git repo on SSH format, not on https).git fetch --allgit reset --hard origin/master(branch)git checkout master(branch)
-
- Make sure your git project has same ssh file name matching like ssh_file_name on semaphore.yml file.
- Go to semaphore -> select organization -> new project and Select Project (add repository).
- On Project List you can see your chosen projects, then click to this project and you can see on the top right side arrow icon, click to that, After click you can see like Install sem CLI & Connect to username, again click to this and you can see two commands like Install sem command line tools and Connect to username organization hit these commands to the terminal to install semaphore on local.

- After successful installation of semaphore on local, hit following command on terminal to add private ssh key to semaphore project
Cmd to add private ssh key:sem create secret ssh_file_name --file ~/Downloads/ssh_file_name:/home/semaphore/.keys/ssh_file_name(key which you was downloaded from server previously and key name should be same like ssh_file_name).
Cmd to view keys:
-
sem get secret.
- Setup has been completed.
- Now after pushing your change on git, your code will automatically deployed on server.